I recently got my hands on Super Mario Maker which lets you create courses for everyone’s favorite plumber to run and jump through. The course editor is easy to use and offers a lot of depth. Therefor I thought I would take this opportunity to write about level design. Starting with an analysis of my first Mario-course. If you have Super Mario Maker you can download and try out the course using the ID-number below.
Course: Let’s-a-go!
ID: 3E9B-0000-0020-9712
Course Analysis
With this course I targeted beginners who had never played a Super Mario game before. The course would need to be fairly easy and teach the basic mechanics through gameplay. In order to achive this, I tried to utilize techniques highlighted by Extra Credits in their analysis of the first level in Super Mario Bros. Techniques which are also brought up by Mario creators Shigeru Miyamoto and Takashi Tezuka in an interview with Eurogamer. Both of which I highly recommend you to check out if you are interested in level design. Also, since Super Mario Maker does not have a checkpoint system, I tried too keep the course short so it would not frustrate new players.
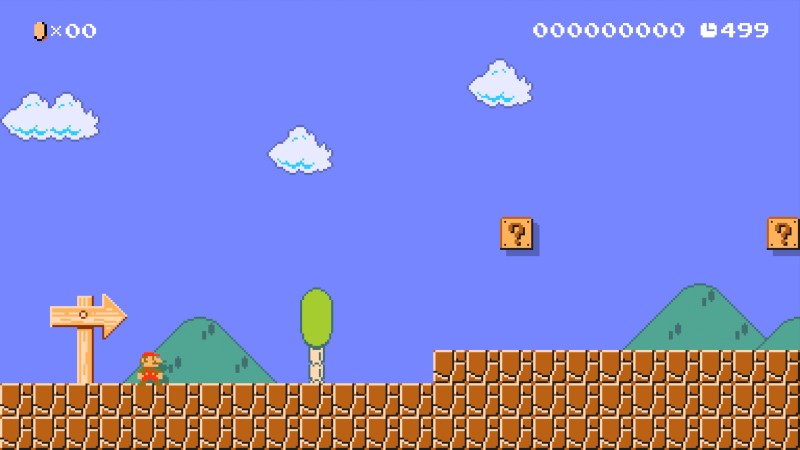
First screen of the course
The course starts with a simple screen where nothing is moving. It sets up the player’s first challenge, walk right, jump up the ledge and hit the ?-block. She has plenty of time to figure this out since nothing here can kill her and nothing dangerous will appear until she has moved so far right that the screen starts to scroll. This will not happen unless the player has been able to jump up the ledge. This is important since jumping is the most vital mechanic in the game. The huge arrow sign is placed there by default and can not be removed. It tells the player that right is the way to go but personally I feel it is redundant since right is the only way to go. According to Extra Credits, the player will instinctively know the way since Mario starts on the left hand side of the screen, facing right. Thus I would remove the sign if it was possible.
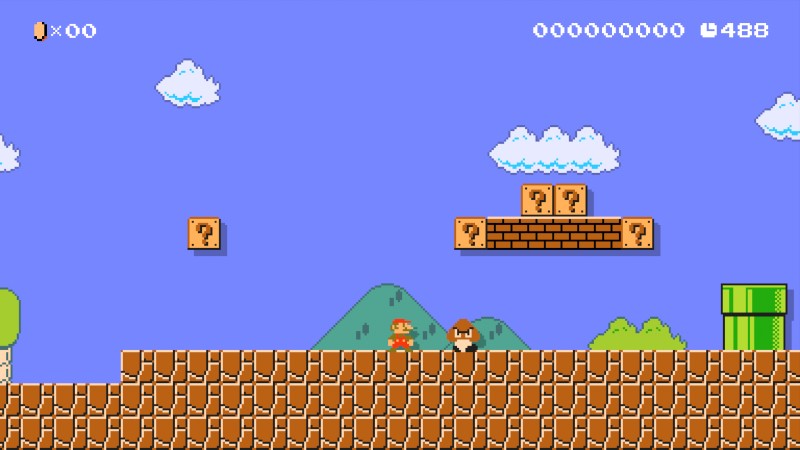
The first enemy and block formation
As the player moves further the screen scrolls and a Goomba appears. This angry looking fellow is an enemy which must be avoided by jumping over it. Since the player already cleared the ledge, she has all the knowledge she needs to accomplish this. Should she fail, she will be brought back a short distance and can try again. While jumping over the Goomba she can hit the blocks above which alters her trajectory and might send her back towards the Goomba, hitting it from above. She will then discover that landing on an enemy will defeat it.
There is a reason why the blocks are placed where they are. Going from left to right, the first ?-block contains a coin that the player gets by hitting the ?-block from bellow. The second ?-block also hides a coin, nothing special there. The third and fourth blocks also have coins but their underside is blocked by brown brick blocks. If the player tries to hit them she will not be able to break through. That is because she is small, regular Mario. If she transforms into the larger Super Mario, she can destroy the bricks and reach the ?-blocks. How does she transform? By touching a red Super Mushroom. Where is this mushroom? In the last ?-block. Hitting the last ?-block releases the mushroom, which travels to the right, falls and bounces against the green pipe before hitting the player and triggers the transformation. If she now goes for the bricks, they will break. By now the player is familiar with the power-up system and how she can interact with blocks.
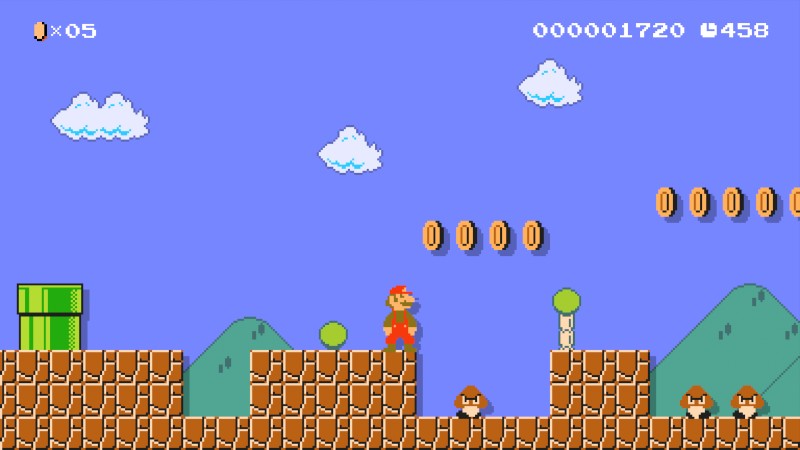
Jump training over pits
Moving on the player encounters some pits of varying sizes and Goombas that falls into them. Here she can observe the enemies movement pattern from a safe distance. In case the player yet has learned how to defeat them, she might do it now if she falls into a pit. The main reason for these pits is to teach the player how to jump over them. A skill needed very soon as she will encounter bottomless pits that results in death if you fall in. Coins above the pits are at different heights. To grab them all, the player must jump over the pit utilizing a strange property of the jump mechanic. The longer you hold down the jump button, the higher Mario will jump. The varying heights of the coins indicates how long the button must be pressed to clear the jump.

The player has kicked a Koopa shell
After jumping over a bottomless pit a new enemy appears. A green shelled Koopa Troopa. This turtle enemy retracts into its shell when jumped on. While in this state the shell can be kicked away across the ground, defeating any enemy in its path. Should it hit a wall it will bounce in the other direction. If the player is not cautious she will be hit. This section of the course showcases all that to the player. A new player will probably not react fast enough before getting hit by the ricocheting shell. But with the mushroom available here, she will also probably be big. Therefor she will not die by the shell, just shrink down into small Mario. There are also some blocks in the air which the player can jump up on to avoid the shell.

Run after the 1-Up!
The block the shell hits contains a green 1-Up Mushroom that grants the player an extra life. The 1-Up moves to the right and will fall down a narrow pit if the player is not fast enough. Mario can walk and run. Most beginners never run and the purpose of this part is to force them to speed up. If they run, they can get the 1-Up and maybe also discover something else about Mario. When Mario runs he can run straight over small gaps like this narrow pit. A beginner may not be able to stop or jump before the pit and thus discovering this property to running by accident.
All in all, there is a lot going on in this section with the Koopa Troopa enemy. I fear it might be too much. It could overwhelm beginners so they do not take in all that this part has to teach. Possibly there would be needed a section before this where the shell does not ricochet off anything. This way the player would be more prepared.

Course cleared!
The course then ends with the classic stair formation from Super Mario Bros and the flag pole that acts as the goal. The stair is effective as it hinders the player to go back and forces her to touch the flag pole. It also playfully invites the player to get as far up the pole as possible, which results in a higher score and even a 1-Up if she manages to touch the very top.
Conclusion
As of writing, 68 people have played the course, according to the statistics kept by Super Mario Maker. 75 attempts have been made at the course and 67 of those have resulted in a successful completion. Resulting in a Clear Rate of 89,33%. Meaning only one player gave up and did not complete the course. Pretty descent numbers for a beginner course. Players die at two different places. The first is the very beginning by the first Goomba. Since it is supposed to teach players on how to deal with enemies, this is expected. The other place is the pit before the Koopa Troopa. Most likely the players have just failed the jump on their first try but it could also indicate that the players fell in trying to avoid the Koopa shell. Overall the Koopa section, feels to chaotic as it introduces many new properties. The course was made short to make it less frustrating for beginners when they die. But it could have been a little bit longer to introduce the Koopa Troopa in more controlled environment. But no player has actually died by the Koopa directly. Which means they are either hit as big Mario or manages to avoid the shell.
References
Eurogamer. 2015. Miyamoto On World 1-1: How Nintendo Made Mario’s Most Iconic Level.
Extra Credits. 2015. Design Club – Super Mario Bros: Level 1-1 – How Super Mario Mastered Level Design.
This was an anlysis of my very first Mario course. Please leave a comment if you have any feedback!
